
Posts
Discover the Best Luxury Flooring in Washington, DC with Classic Floor Designs
When it comes to transforming a home, nothing speaks sophistication quite like premium flooring. At Classic Floor Designs in Washington, DC, we specialize in curating the finest in luxury flooring options to elevate any space. Whether you’re looking for timeless hardwood, plush carpets, or unique tile patterns, we provide flooring that combines elegance with functionality.
Why Choose Classic Floor Designs?
With decades of experience serving the DC area, Classic Floor Designs has earned a reputation for exceptional quality and personalized service. Our team of flooring experts works closely with each client to understand their unique needs and style preferences, ensuring every choice enhances the character and charm of their home.
Luxury Flooring Options for Every Style
1. Hardwood Flooring
Our hardwood collection is unmatched in both quality and variety. From rich mahoganies to classic oak, our hardwood flooring is crafted to stand the test of time. Known for its durability and warm aesthetic, hardwood is ideal for those looking to add value and style to their home.
2. Exquisite Carpeting
For those who appreciate the warmth and comfort of carpet, we offer a range of luxurious options. Our carpets come in an array of colors, patterns, and textures to suit any design vision, adding a cozy layer of sophistication to any room.
3. Unique Tile Flooring
Tile flooring provides endless opportunities for creative expression. At Classic Floor Designs, we offer tiles in diverse materials, including porcelain, ceramic, and stone, allowing you to make a bold statement or achieve a classic look.
The Classic Floor Designs Difference
We pride ourselves on more than just premium products; our dedication to craftsmanship and customer satisfaction is what sets us apart. We are here to guide you through the selection process, from helping you choose the right material to installation, ensuring a seamless experience and a beautiful outcome.
Visit Classic Floor Designs Today
Ready to upgrade your home with the finest in luxury flooring? Visit our Washington, DC showroom to explore our collections and find the perfect fit for your style. Experience the Classic Floor Designs difference and discover why we’re Washington’s choice for luxury flooring.
The Best Types of Hardwood Flooring for Your Home
When it comes to choosing the right flooring for your home, hardwood is often the preferred choice due to its durability, timeless appeal, and the value it adds to your property. However, with so many types of hardwood flooring available, making a decision can be daunting. This guide will help you navigate the best options, taking into account factors such as aesthetics, durability, maintenance, and cost.
1. Oak: The Classic Choice
Why Choose Oak?
Oak is one of the most popular choices for hardwood flooring in the United States, and for good reason. It is incredibly durable, resists wear and tear, and has a beautiful grain that can complement a variety of home styles.
Types:
Red Oak: Known for its warm tones and prominent grain patterns.
White Oak: Offers a more subtle, smoother grain and is slightly harder than red oak.
Pros:
Durable and long-lasting.
Available in a wide range of stains and finishes.
Readily available, making it more affordable.
Cons:
Red oak can sometimes have a pinkish hue that may not be to everyone’s taste.
2. Maple: The Sleek and Modern Option
Why Choose Maple?
Maple is valued for its clean, light appearance, making it an excellent choice for contemporary or minimalist interiors.
Pros:
Extremely hard and durable, even more so than oak.
Less porous, which means it’s more resistant to moisture and staining.
Light color can brighten up a room.
Cons:
Limited grain pattern may not appeal to those who prefer a more rustic look.
Can be challenging to stain evenly.
3. Hickory: The Rustic Favorite
Why Choose Hickory?
Hickory’s distinctive grain pattern and color variations make it ideal for rustic and country-style homes. It’s one of the hardest woods available, making it highly durable.
Pros:
Extremely hard and resilient.
Unique, bold grain patterns and color variations.
Excellent for high-traffic areas and families with pets.
Cons:
Can be more expensive due to its hardness.
Bold patterns may not suit all interior styles.
4. Walnut: The Elegant Choice
Why Choose Walnut?
Walnut is synonymous with luxury and sophistication. Its rich, dark color and smooth, fine grain make it a favorite for high-end homes.
Pros:
Deep, rich color adds warmth and elegance to any room.
Smooth grain provides a sleek, refined look.
Moderately hard, making it durable yet comfortable underfoot.
Cons:
More susceptible to dents and scratches compared to harder woods.
Higher cost.
5. Cherry: The Warm and Rich Option
Why Choose Cherry?
Cherry wood is known for its beautiful, rich, reddish-brown color that deepens with age. It’s a softer wood, which means it can develop a unique patina over time.
Pros:
Warm, rich tones that deepen and improve with age.
Smooth, fine grain.
Adds a sense of luxury and warmth to any room.
Cons:
Softer and more prone to dents and scratches.
Can be more expensive.
6. Bamboo: The Eco-Friendly Alternative
Why Choose Bamboo?
While not technically hardwood, bamboo is a sustainable, eco-friendly option that offers the look and feel of traditional hardwood.
Pros:
Environmentally friendly and renewable resource.
Highly durable and hard.
Unique, modern aesthetic.
Cons:
Can be sensitive to moisture and humidity.
Limited color options.
Maintenance Tips for Hardwood Floors
Regardless of the type of hardwood you choose, proper maintenance is crucial to ensure its longevity. Here are some tips to keep your floors looking their best:
Regular Cleaning: Sweep or vacuum regularly to remove dirt and debris that can scratch the surface.
Use Rugs and Mats: Place rugs in high-traffic areas and mats at entrances to minimize wear and tear.
Control Humidity: Use a humidifier in dry climates and a dehumidifier in humid climates to prevent the wood from expanding or contracting.
Avoid Harsh Chemicals: Use gentle cleaners specifically designed for hardwood floors.
Choosing the best hardwood flooring for your home depends on your personal style, the level of foot traffic, and your budget. Oak and maple are great all-around choices, while hickory and walnut offer unique aesthetics and durability. Cherry adds warmth and elegance, and bamboo provides an eco-friendly alternative. With proper care, any of these hardwoods can enhance the beauty and value of your home for years to come.
Hardwood Flooring Patterns: A Guide
Hardwood Flooring Patterns
You love the idea of having hardwood floors in your home. But before your beautiful hardwood flooring can be installed, you must decide on the installation pattern. The pattern design selected will ultimately play a major role in the look of the finished project and the overall style in the room. There are six primary installation patterns that you should learn about before you finalize your decision.
Straight
 Through a straight installation design, the hardwood planks are installed either vertically or horizontally across the floor. Generally, they follow the direction of the longest wall in a smaller room or along the direction of the shortest wall in a larger room to take advantage of optical benefits. While this is a plain and common installation method, it continues to be popular because of its simplistic appeal.
Diagonal
 If you prefer the long lines created by a straight design, a creative alternative is a diagonal installation method. The diagonal design generally runs at a 45-degree angle from the walls, but you can take creative license with the severity of the angle. Because of the precision needed to cut each board precisely, this design requires the skills of an experienced floor installer.
Random
 The random design can be used in conjunction with straight or diagonal installation methods. While the straight and diagonal methods use boards with comparable dimensions, the random installation method uses boards with different lengths and widths. This results in a floor with fascinating personality.
Parquet Pattern
 The parquet design may also be referred to as a brick design. It is appropriately named because the wood slats are cut into small pieces with equal lengths. These pieces are laid in a manner that visually creates square shapes. The flow of the slats alternates for a stunning and interesting visual effect.
Basket Weave
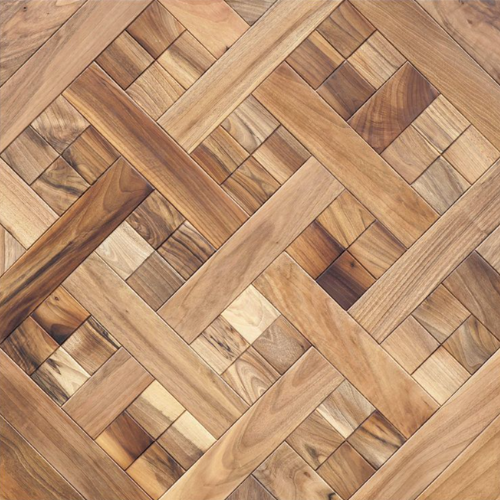 A variation of the parquet design is the basket weave style. It incorporates small square pieces surrounded by longer wood planks. The unique design creates a woven look that is both sophisticated and interesting. This type of installation design generally looks best when wood with deep color variations is used.
Chevron
 The chevron design is both classic and increasingly popular in modern décor. The wood planks are installed in a V-shaped pattern that zigzags across the room boldly. The overall look of the design can be adjusted by the number of boards used in each V-shaped angle and by the dimensions of the boards.
Herringbone
 The herringbone design is visually similar to the chevron pattern with one significant difference. The boards in the chevron design have mitered edges. The herringbone’s boards are not mitered. Like the chevron design, the herringbone look is visually fascinating. However, it may be slightly easier to install because no mitering is required.
Hardwood Flooring Style Selection Tips
With many beautiful design possibilities to consider for your upcoming floor installation project, how can you make the right decision for your space? While the overall look of the design is a matter of personal preference, you should keep in mind the shape of the room and the overall line of sight from common entryways. In addition, the installation recommendations from the manufacturer may reveal helpful insight. Your budget may also play a role in the design that you select. More complicated designs require more skill and time. Designs with more cuts may require the use of more materials.
Are you eager to see a beautiful improvement to your home’s décor? At Classic Floor Designs, we have the expertise to bring your vision to life. During an initial consultation, we can help you to review the beautiful hardwood materials that may work well with the look that you have in mind. To schedule a consultation with one of our designers, contact Classic Floor Designs today.
Is It Better to Repair Scratches in Hardwood Flooring Yourself or Let the Experts?
Wondering if you should refinish your hardwood flooring yourself or bring in flooring professionals to fix scratches and more is not an uncommon situation to be in. Contrary to what a quick Google search may tell you, the pros of a self-refinish do not outweigh the cons of hiring a professional. We’ve compiled a quick list of problems our clients have run into when they’ve attempted a DIY (Do-it-yourself) refinish for their hardwood flooring.
Lower Quality Finished Product
You gather all the materials needed, watch hours of tutorials on fixing scratches in your hardwood flooring on YouTube, maybe ask a couple of friends to tag along, and now you are finally ready to get started. Unless one of your buddies is a professional carpenter, you’re already at a disadvantage. Just watching a few hours of videos doesn’t make you a professional. You are bound to run into problems, especially if this is your first time refinishing hardwood. These problems, however minor they may seem, tend to stack up.
The machine experts use to refinish floors can cost upwards of $20,000. Even a higher end machine, rented from a hardware store such as Home Depot, can’t measure up to what a professional would bring to the job. Calculate the cost of all equipment you may need, including goggles, masks, gloves, and knee pads, and you may already be better off hiring flooring professionals. Keep in mind that any mistakes made by a hired professional be corrected at no extra cost to you, while any damage you cause yourself will come right out of your pocket.
The Finish Will Not Last as Long
Sanding scratches out of your floor is a delicate art. If any error occurs during the process, the stain and polyurethane may not adhere properly. This could put the longevity of your finish at risk, limiting its lifespan to only two to four years. Using a professional service, you can expect your finish to last seven to ten years. Any cost saving you thought you had, could be lost.
It Will Take Longer
Someone with experience will obviously complete a task faster than someone without it. Flooring professionals typically take around a day to sand and refinish 1,000 square feet of hardwood. Homeowners attempting to do it on their own could take three to five times longer. After adding in the cost of renting equipment, you may start to wish you had put that money toward hiring professionals.
Verdict: Hire a Professional
We get it. The cost of refinishing and fixing scratches in your floor can be daunting and it is natural to have a DIY, cost-saving mindset. But the truth is, we’ve heard one too many horror stories from clients who initially tried to do it themselves. Give us a call for a completely free consultation at (202) 872-9860. Classic Floor Designs has over 40 years experience in the DC metro area and would love to put that experience to work for your next hardwood flooring project.